
Apple WWDC 2014 is finishing today and as I wrote earlier there were a lot of exciting new things being unveiled during the Keynote Speech at the start of the conference. On that post I have detailed some of the cool things Apple presented, especially the ones the will impact us as Mobile Photographer.
One of the good thing about this conference is that if you can’t attend it in person you can still enjoy the session’s videos that are available at the WWDC site. And from one of these videos I watched that I learned some good news that made me wanted to jump and punch the air! This is the reason why I’m writing this post, I want to share this great news with you all.
So are you ready? Listen to this …
iOS 8 is giving app developers Manual Control over its Camera functions!
This will include control of Camera Focus, White Balance and Exposure, which in turn includes Shutter Speed and ISO!
Additionally, developers gains ability to add Exposure Compensation, and Auto/Manual Bracketing functions to their app.
This is what passionate iPhoneographers like you and me have been waiting for! A chance to take our creativity to the next level and closing in the gap between Mobile Photography and the more traditional one.
So, let’t take a look what Apple means exactly by ‘Manual Camera Control’. Below I will share with you what I understood from the session. I will also explain to you how much control we have over these features in the current iOS and iDevices. And finally for each topic I will also show you some screenshot I took from the video of the session I mentioned above where they give a Demo on the subject.
Focus
Let’s start with the Manual Focus. Right now with the current iOS focusing process is mostly done automatically. You can tap to choose where you want the camera to focus, and additionally you can lock the focus.
In iOS 8 you can have a full manual control of the focusing lens. Just like in SLR camera where you can do manual focus by turning the focusing ring of the lens, you can do the same thing with your iPhone Lens, digitally of course.
This means that you no longer have to tap on the point where you want the lens to focus, which in some situations don’t always work (e.g. try to focus on a moon). Instead you can manually adjust the focus for which ever point you want to be sharp.
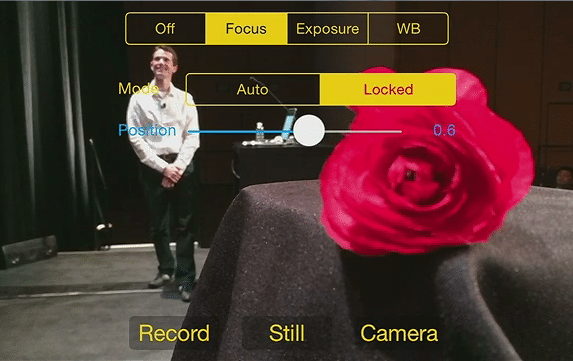
Manual Focus on the table
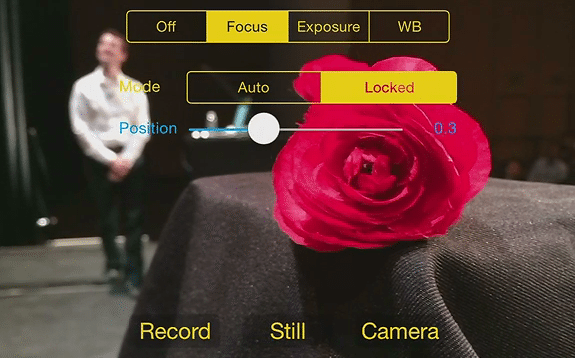
Manual Focus on the flower
Other possible cool implementation might be to store multiple focus points for the same image, which then one can choose where to focus after the image has been capture, A.L.A Nokia Refocus or Lytro Photography.
Exposure
The next one is the Exposure Control. In Photography, Exposure is traditionally controlled by 3 key elements:
1. Lens Aperture: The size of the opening in the lens when a picture is taken.
2. Shutter Speed: The duration during which the shutter is open, i.e. the time taken for the camera sensor to be exposed.
3. ISO: The sensitivity of the camera sensor to light.

As far as iDevices concerns the first key element, i.e. the Aperture, will never change and cannot be changed. The Aperture of all iDevices Lens is fixed. So, unfortunately this will always be iDevice’s Achilles Heel. It won’t matter too much in term of general photography, but having a manual control over lens aperture is one way to achieve some advance photography effects such as Shallow Depth of Field (or Bokeh).
What about the other 2 elements? Right now, if you use the standard Camera app, the Exposure is measured automatically by the app. The only way to sort of ‘manually‘ control this is by locking it. You can do this by ‘tap and hold’ anywhere in the camera viewfinder where you want the app to take the measurement. The ‘AF/AE Lock’ sign should be shown on the screen when the app has successfully attained the lock. From then on, no matter where you point your camera at, the exposure value will not change.

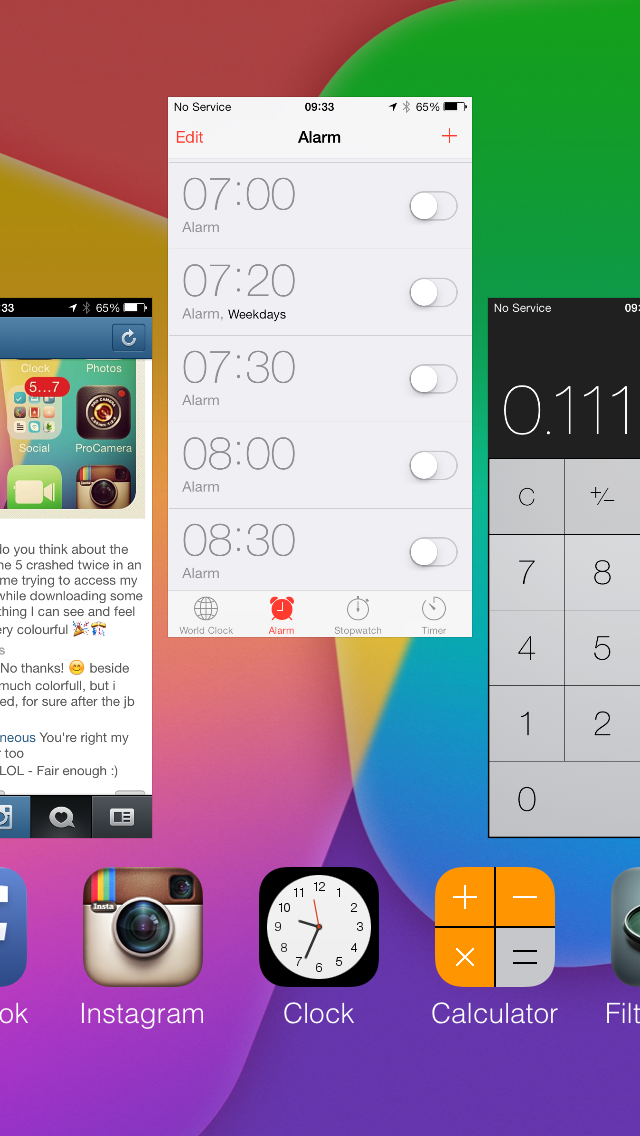
AE/AF Lock
For more manual control than this you will need to use one of the third-party camera app, such as ProCamera 7 or 645 Pro MK II. Using these advance Camera Apps you can set Focus and Exposure separately, in auto or lock mode.
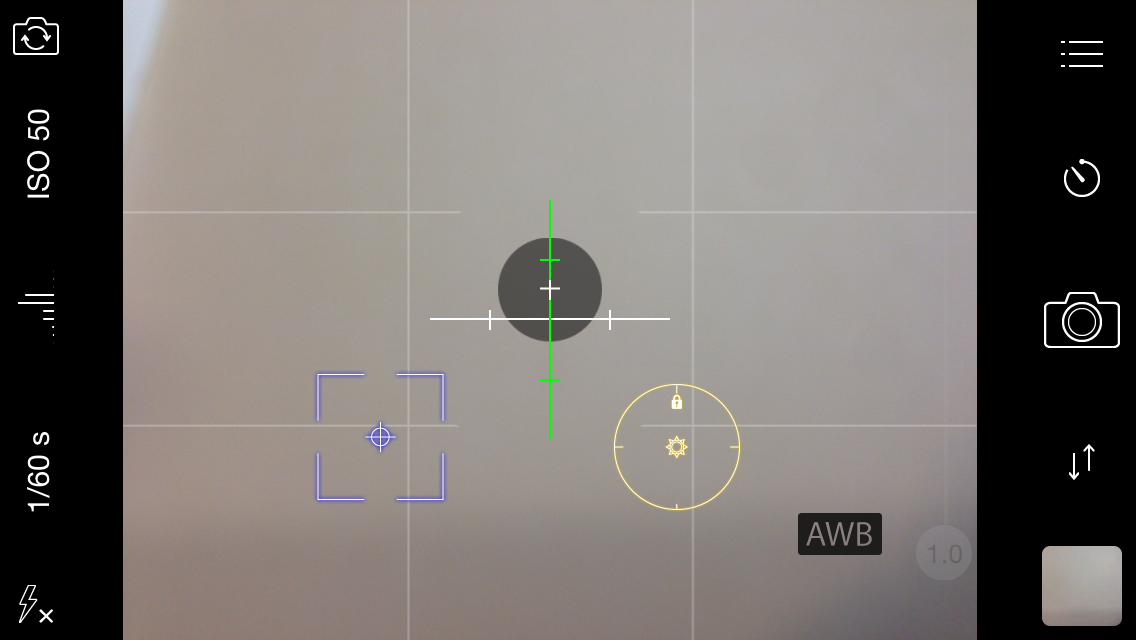
Split Focus and Exposure in ProCamera 7
These app also feature what is normally called the Night Mode. When this mode is switched on, you can choose a ‘minimum shutter speed‘ (up to 1s) from a pre-defined list that the camera should use.
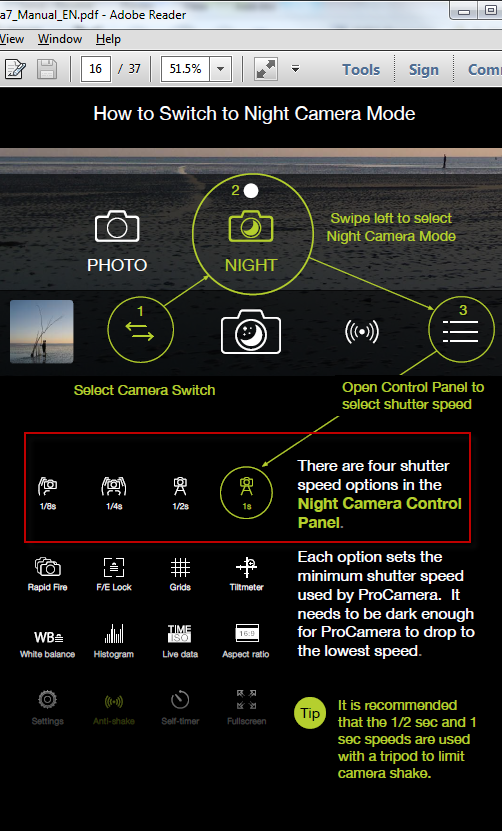
Night Mode in ProCamera 7

Low Light in 645 Pro MK II
Note that we are just setting a ‘minimum shutter speed value’ here, there is still no way to actually manually set the speed to any arbitrary value we want.
The situation is far worse with the ISO gain setting. Right until recently, we’ve never had any control over what value the ISO was set in the camera. If you have an iDevice that support it (e.g. iPhone 5 or later), Apple introduced what is called Low Light Boost which will enable the camera to set the ISO up to 3200.
Again, we still have no way of manually set the ISO gain to a specific value that we want (like we can do in SLR camera).
Well, despair no more! Because all of these will soon change! With the arrival of iOS 8, Apple is allowing the developer to manually set both Shutter Speed and the ISO gain! I am expecting that all my favourite camera apps will be upgraded to use these manual controls when iOS 8 is released. It’s a very exciting time for all of us I might say.
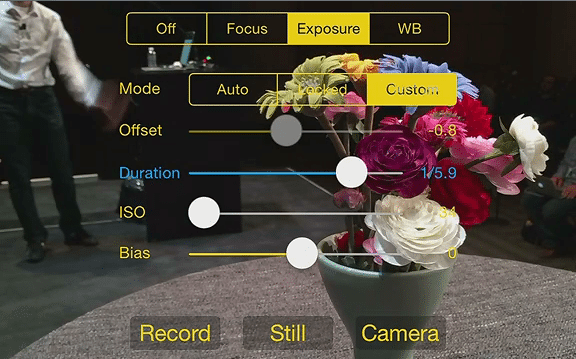
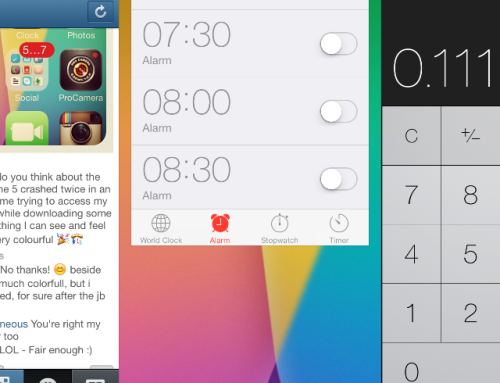
Manual Exposure for Duration/Shutter Speed and ISO
Exposure Compensation
In addition to the above Exposure Control, Apple has also given the developer the ability to do Exposure Compensation in iOS 8. If you’ve taken picture with SLR camera, you will understand what I’m talking about here.
When you take a picture, sometimes you want to play around with the amount of Exposure (slightly brighter or darker) that affects the image, but you don’t want to change those 3 key elements I’ve described above.
What you can do is to use Exposure compensation (or Bias as Apple calls it), measured in f-stops, to increase or decrease your Exposure. For each stop increase in the f-stop, the brightness will be doubled. For each stop decrease in the f-stop value, the brightness will be halved.
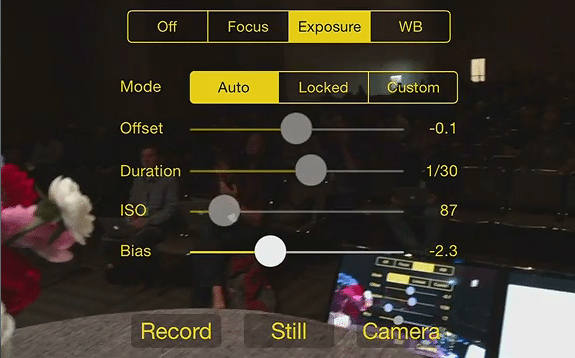
Exposure Compensation in Auto Mode
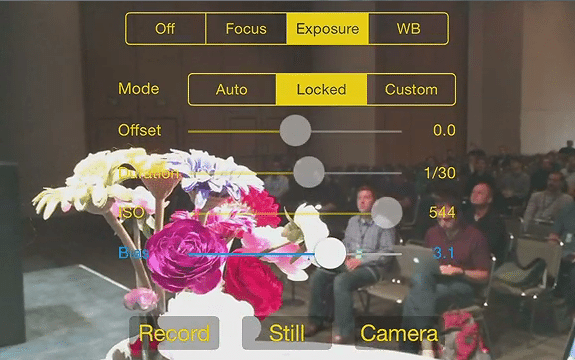
Exposure Compensation in Locked mode
This technique of using Exposure Compensation is quite useful when you are not too sure which Exposure value is the best for a given scene. It is also widely use ‘trick‘ that is used by photographers to create High Dynamic Range (HDR) photo, by taking the same scene with different f-stops (A.K.A Bracketing) and combine them into one HDR image.
I would expect that third-party camera apps will have this feature added to their arsenal, especially ones that can create HDR image.
Manual White Balance
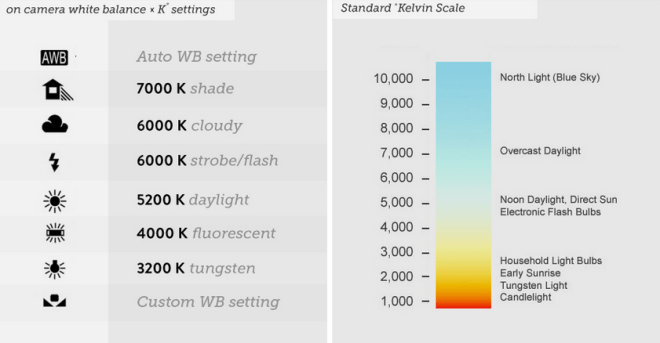
White Balance is one photographic concept that is not very easy to explain with words, but I will try. White Balance is a photographic process to remove unrealistic colour cast. Pictures taken under different lightning conditions can come out with bluish or yellowish colour cast, which is not exactly the real colour of the object we took at the first place.
We get a lot of this effect especially when we take photos indoor using artificial light, though outdoor type pictures could exhibit similar symptom especially if we take the picture when the sky is very bright and overcast. Every type of lighting affect the colour differently. For example a flourescent light tends to bluish colour while tungsten (bulbs) lights or candles tend to add yellowish tinge.
These shades of unrealistic colours are also known as Colour Temperature (measured in Kelvin), where red or yellow cast is considered ‘warm’ and blue cast is considered ‘cold or cool’.
Apparently human eyes can judge very well what is considered to be white colour under different lighting and make immediate adjustment to show us the real colour. But digital camera sensor often has trouble with Auto White Balance. This is where the Manual White Balance comes in.
Currently with iDevice we have only White Balance in Auto or Locked mode. In auto mode, the camera will calculate and set the white balance value according to this calculation, which as we said earlier can be incorrect. In Locked mode, which is as far as we can get in term of manual control, we can lock the value of the White Balance according to where we point our camera to. You need to use third-party camera apps to be able to do this by the way.
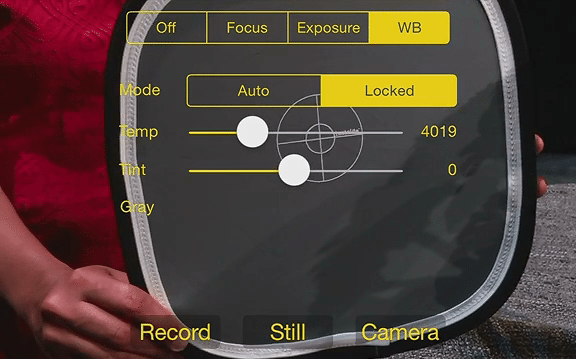
In iOS 8 camera app will have a full manual control on the Temperature (Yellow to Blue cast) and the Tint (Green to Magenta cast)!
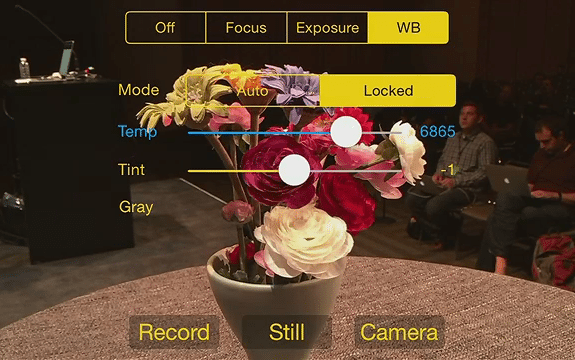
Manual White Balance – Temperature

Manual White Balance – Tint
I can imagine that iOS 8 Camera apps would gain additional sliders to set each of these properties manually. Or the developer could provide a set of predefined White Balance value, like we usually get with pocket or SLR camera, according to the lighting condition.
White Balance pre-defined settings
Lastly, iOS 8 also provides new API to set the ‘Gray‘ reference value. This is one of photographic technique to ‘reset and lock’ White Balance to a specific neutral value by pointing the camera to a special Gray card.
Manual Gray value setting
Actually we can already do this with current iOS, i.e. just by pointing our iDevice camera to the Gray card and lock the value. But with iOS 8 this is done explicitely.
Bracketed Image Capture
I have touched briefly about Bracketing when I talked about Exposure Compensation above. Again Bracketing is a photography technique where we take a multiple shots of the same scene with slightly different settings.
Typically it’s the Exposure value (Ev) which one normally tries to vary by using the Exposure Compensation feature. Bracketing can be done manually, take one shot with one setting, change the setting and take another shot, etc. Or it can also be done automatically, i.e. Autobracketing. Using this mode the camera will take a multiple shots with predefined settings in one go. Normally it will take one stop darker, one normal and one stop brighter, which create 3 shots. Or it can also take 5 shots in one go; 2 darker, 1 normal, 2 brighter.
Bracketing is also a widely used technique to create light and dark image components that will be fused together to form an HDR image.
iOS 8 has added APIs that allow developers to do Autobracketing with Ev compensation, and Manual Bracketing with control over Duration/Shutter speed and Exposure.
I can imagine that these functionalities will get incorporated to existing third-party camera apps. And I really hope that any app that feature HDR creation would finally add Autobracketing (3 not just 2 images) in their tool.
Final Thoughts
When I saw the video and finally digested the info that was being fed to me, I realised that this is it! This is the ‘Holy Grail‘ that all of us Mobile Photographers had been searching and hoping all this time. Being able to set Exposure manually would take our creativity to the next level. And I am confident that the App Developers will take advantage of all of these advancements and work hard to include it in their iOS 8 version.
I am very very excited to see what they will come up with!
Are you?


[Insight] iOS 8 Provides SLR-like Manual Camera Controls (Focus, Shutter Speed, ISO, White Balance) http://t.co/T9g8FuVk3o #WWDC14
[Insight] iOS 8 Provides SLR-like Manual Camera Controls (Focus, Shutter Speed, ISO, White Balance) http://t.co/PekcysknCF #WWDC14
It’s about time. iOS 8 Provides SLR-like Manual Camera Controls #mobilephotography – Moblivious – http://t.co/BP9kCVCihx via @Shareaholic
RT @moblivious: [Insight] iOS 8 Provides SLR-like Manual Camera Controls (Focus, Shutter Speed, ISO, White Balance) http://t.co/T9g8FuVk3o …
Are you ready for this?
#iOS8 Provides SLR-like Manual Camera Controls – Focus, Shutter Speed, ISO, White Balance. http://t.co/bHzDLDz12J
Are you ready for this?
#iOS8 Provides SLR-like Manual Camera Controls – Focus, Shutter Speed, ISO, White Balance. http://t.co/q82FHthREB
#iOS8 will provide SLR-like Manual Camera Controls http://t.co/nkvI5PImx9
iOS 8 Provides SLR-like Manual Camera Controls – Moblivious – http://t.co/tmSrmtdFTb via @Shareaholic
[…] Source […]
RT @moblivious: Are you ready for this?
#iOS8 Provides SLR-like Manual Camera Controls – Focus, Shutter Speed, ISO, White Balance. http:/…
Ios 8 provides SLR like camera controls ! http://t.co/ZHZAc0F6qY
RT @isabelleplass: iOS 8 Provides SLR-like Manual Camera Controls – http://t.co/ELCBDyZTRK via @Shareaholic
[…] Image Editor and Photo Filter I’ve known. The new version of Camera+ added the iOS 8 style Manual Camera Control. This includes control over focus, exposure compensation, shutter speed, ISO and White Balance. […]