

Many iPhone/PC users (as opposed to iPhone/Mac users) are not sure how to transfer/import/download/save their iPhone photos/videos to the PC. Worst, they think they need something like iTunes to do this supposedly simple thing. Well, it turns out that it is indeed quite simple, as simple as saying ‘Plug and Play’. In fact, I like the way Windows deals with this issue compared to Mac OSX.
In Windows, the iPhone (and presumably other iDevices) is considered one of USB devices, hence it’s treated like it!
The only limitation is that Windows is only allowed to ‘see’ the Camera Roll folder! You don’t have access to other ‘internal’ folders of the iDevices, presumably this is for our own protection, though others (read: non-iPhone users) would scream ‘Freedoommm!’ – or the lack of it that is.
So, since the iPhone is treated as a USB device, you can practically plug the USB cable from your iPhone to your PC and you are ready to transfer your photos/videos.
Be aware that while you can easily download your photos from iDevices to your desktop, the reverse is not true! You can NOT just drag and drop photos to the iPhone. So if you want to transfer photos/videos from your desktop back to iDevices please read my tips here.
In this post I want to show you 2 ways of importing the photos/videos; one is the simplest one and the other is the quickest.
Note that both techniques require a physical connection between your iDevice and the PC via the USB Cable. Each of them has its own pros and cons. You may choose which ever you see fit to your situation. You can in fact use both depending on the need.
Now let’s have a look at the simplest one first.
The Simplest
This is easy:
1. Plug the USB cable from the iDevice to the PC.
2. In Windows, open My Computer.
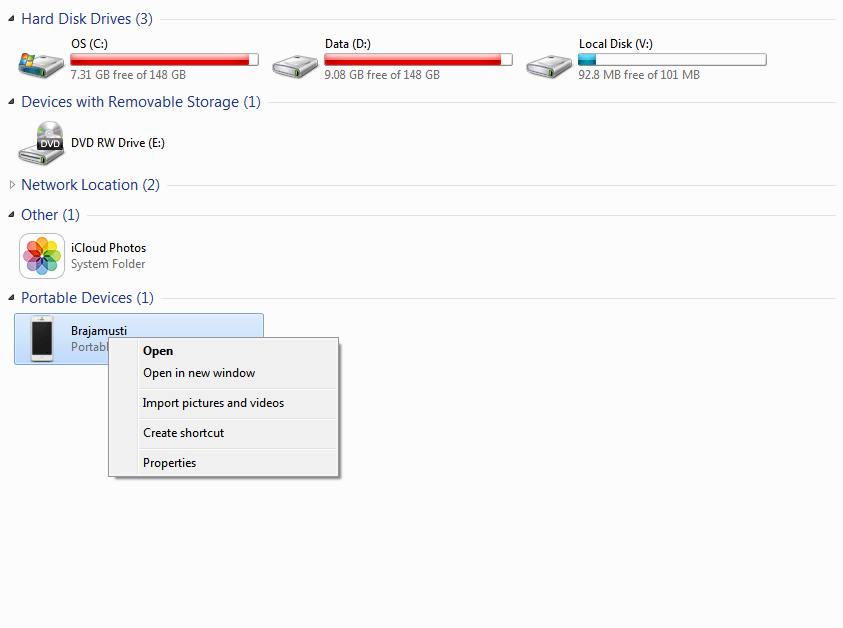
3. You should have the name of your iDevice under Portable Devices.
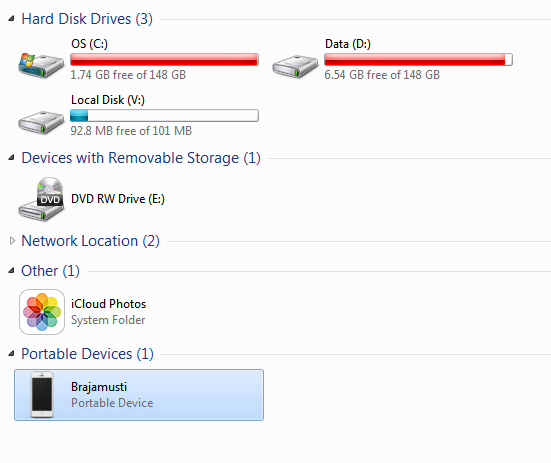
iDevice in My Computer
4. Double click on the iDevice icon. You should see the Internal Storage icon with descriptions underneath showing the total capacity of your iDevice storage and how much from that is free.

Internal Storage
5. Double click on the Internal Storage icon. You should see the DCIM folder. This is the Camera Roll folder and as I said before this is the only folder you are able to see.

DCIM folder
6. Double click on the DCIM icon. Now, you might see different view here, but basically you should see a bunch of folders with seemingly random name. Don’t ask me what they means, it’s something to do with maintaining the image name unique.

Under DCIM Folder
As you can see in my screenshot, I only have to folders, that’s because I just refreshed my iPhone and practically started over. But if you’ve had your iDevice for long you might see even more weird name folders.
7. Anyway, if you look inside each of this folder you should find your photos and videos. And from here you can just copy them to your local hard-drive. You can also delete them.
What you cannot do is to copy photos from your local hard-drive to the iDevice. You can only transfer out not in.
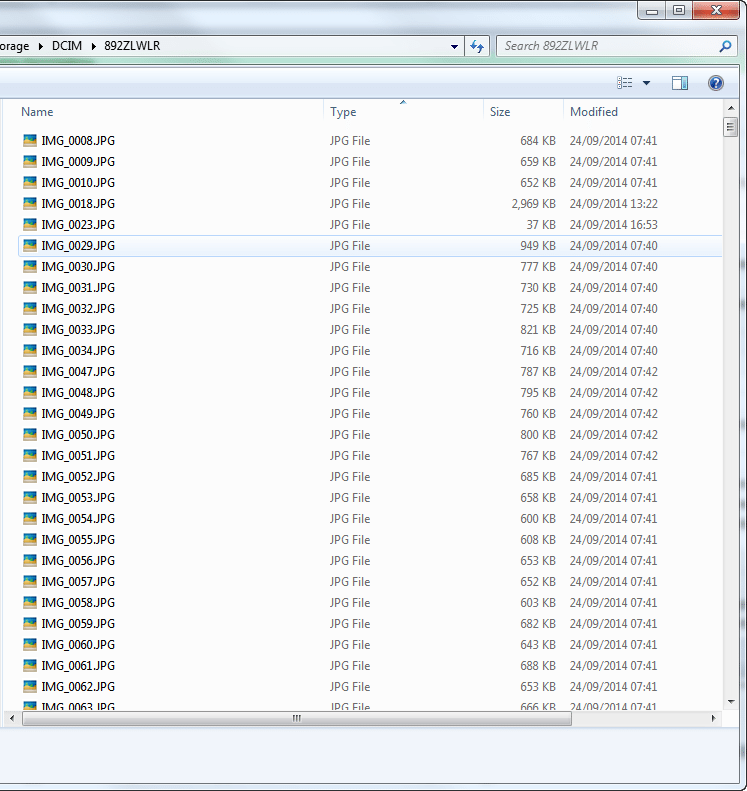
Photos and Videos
11. Unfortunately, and this is the drawback, there is no indication into which folder your particular photos would reside. Even looking at the Date Stamp wouldn’t help as they all seem to be stamped on the same day. Consequently, if you want to copy the last photos you just took you will need to hunt them down by opening the folder ONE BY ONE! Crazy huh!
Well fortunately there is one small trick you can do to give your sanity back!
On the DCIM folder, simply put an asterix, that is the ‘*’ symbol on the search box at the top right corner of the file explorer. This will basically show all files under all subfolders on the same page. Sanity back … done!
Unfortunately, you still can’t copy the files in batch, in fact you have to resort to Copy and Paste the photo ‘one at the time‘ because you can’t do drag and drop!
So while your sanity is back, your patience might be tested.
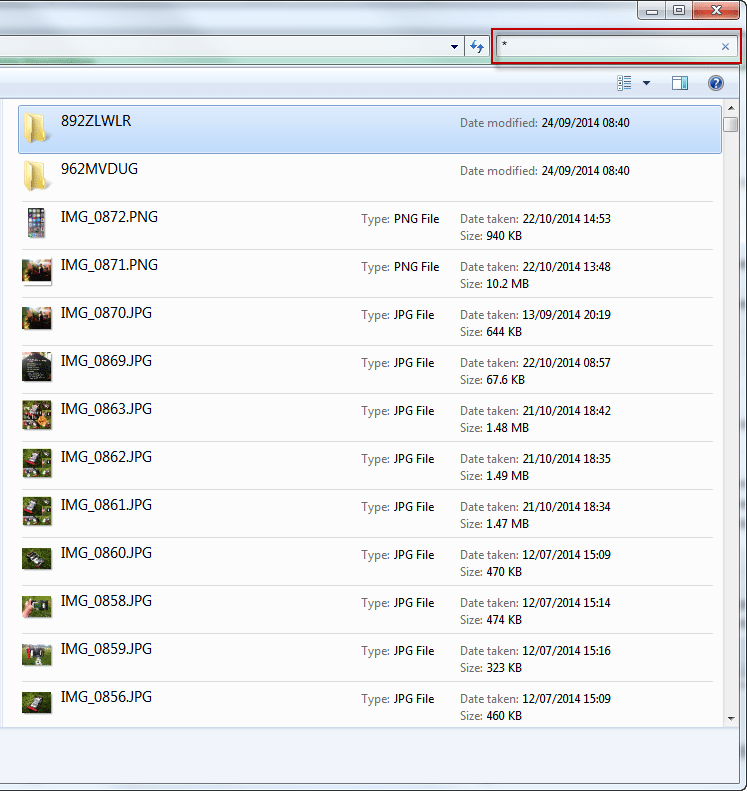
Search All Files
Update: I found a workaround to at least to batch download images on the same folders (thanks for our readers who had pointed me out on this tips in the comment).
So when you get all files shown on Explorer using the ‘*’ trick, search for one of the image you wanted to download.
Let’s say you found one. Right click on the images and choose ‘Open File Location‘ from the menu.
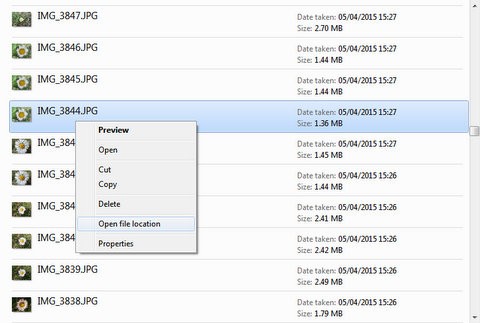
This will open the folder where the image is located. From here you can do the usual Batch Drag and Drop with no problem.

Phew! We found our sanity back AND our patience has been paid off!
You might argue that this is not simple at all, but after trying other ways of transferring photos, I decided that this is the simplest and most straight-forward of all. But maybe after learning the quickest technique I describe below, you might choose differently.
The Quickest
The quickest way of transferring photos/videos from your iDevices to your PC is by using the Import Pictures and Videos feature of Windows. This functionality comes with every Windows OS as a standard. Why is it the quickest, because once you set it up, the process is almost automatic!
1. Plug the USB cable from the iDevice to the PC.
2. If you are lucky, Windows would recognise the device and run the AutoPlay function. This functionality would normally run any time any external peripheral is attached to the PC. This peripheral could be a CD/DVD, an External Hard-drive, or an iPhone or iPad.
After doing some searching the AutoPlay should run the Import Pictures and Videos automatically, but if you just can’t wait for it, you are free to just select it from the list in the dialog box.
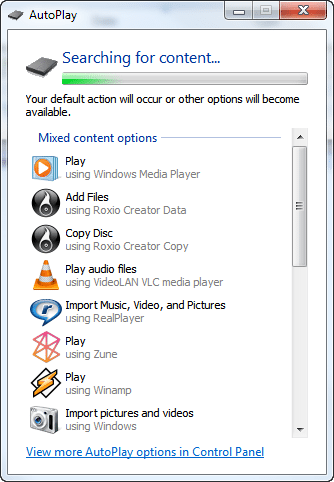
Autoplay Dialog
3. If you are not that lucky, and you don’t get the AutoPlay dialog box appears, it might be because your Windows settings have changed or you might’ve installed some other third-party app and it’s overriding the default settings.
4. To see whether your Windows settings are correct, open the Windows Start Menu and select the Control Panel menu item. This will open the Control Panel window. On the Search Bar type in ‘AutoPlay’. This will show all settings menu that has anything to do with AutoPlay. Click on ‘AutoPlay’ from the list. This will open the AutoPlay Settings page.
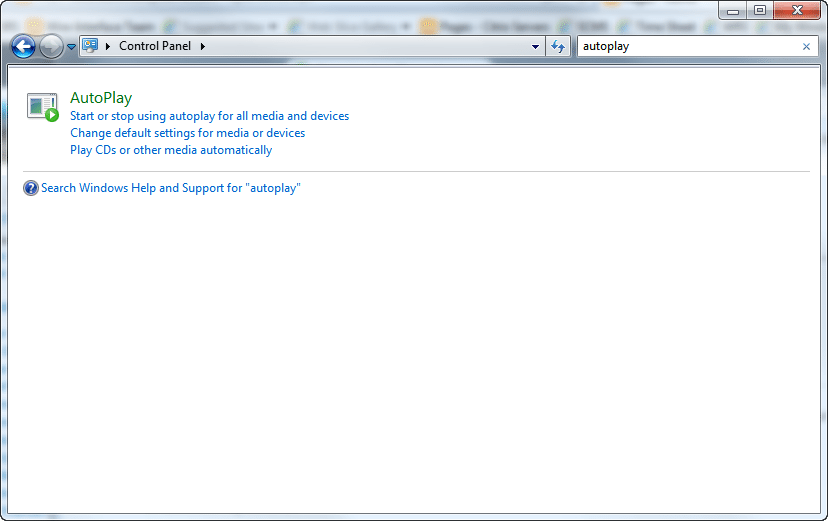
AutoPlay in Control Panel
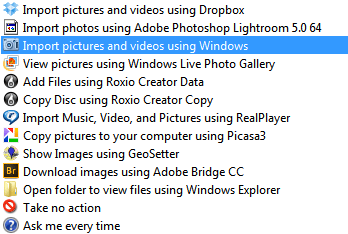
Scroll down until you see settings for Apple iPhone and Apple iPad. The setting for each of these items should read ‘Import pictures and videos using Windows‘.

Autoplay Setting For iPhone/iPad
If not, drop down the combo-box for each of them and change the setting. If they have already the correct setting then that means some other application is overriding it. Don’t worry about this as we can still do it manually.
Autoplay Setting Options
5. Just like the first method, observe that your iDevice name will appear in My Computer. Instead of double-clicking it do a Right Click. This will give you the contect menu, and one of the menu item is, yes you guess it, the Import Pictures and Videos! Select this item.
ContextMenu
6. The Import Pictures and Videos will be run as soon as you select the menu item. It doesn’t look very much at a first glance I must say. It’s just a small dialog box with a Cancel button on it. But notice that it also have a link to ‘Import Settings‘. Click on this quickly!

Import Pictures And Videos
7. The Import Settings window should open now. This contains some important settings with which you can configure how the functionality should work.
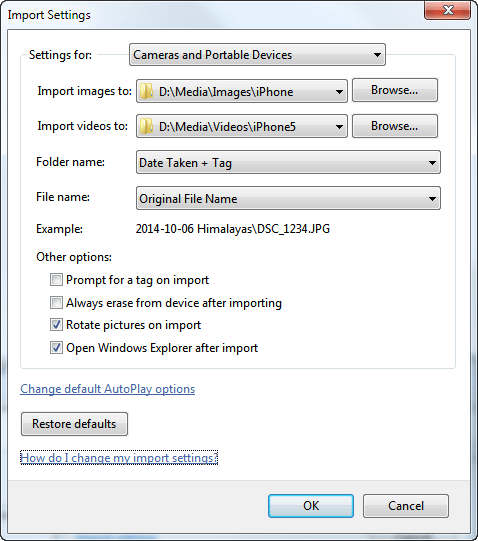
Import Settings
Some notable settings are as follows:
- Import images to and Import videos to settings. Here you can choose where your photos and videos will be transferred to.
- Folder Name and File Name are to configure how you would want Windows to name the target folder and image file name.
- Have a look at the options available and set them to the one you want.
- Other options are self-explanatory.
Import Settings – FileName

Import Settings – FolderName
When you are satisfied with your choice, click on OK to confirm.
8. The Import Pictures and Video will restart and begin to look for any new photos or videos to transfer.

Import Restart
9. At the end of the transfer, the dilogl close itself. Then you can check the newly transferred photos/videos on the path you configured previously on the setting.
10. Note that Windows ‘remembers’ which photos/videos that it has already transferred, so the next time you run the function again it will only transfer the new one.
But in any event where you want to re-download everything all over again, you can do this by deleting the following file:
C:\Users->[username]->AppData->Local->Microsoft->Photo Acquisition->PreviouslyAcquired.db
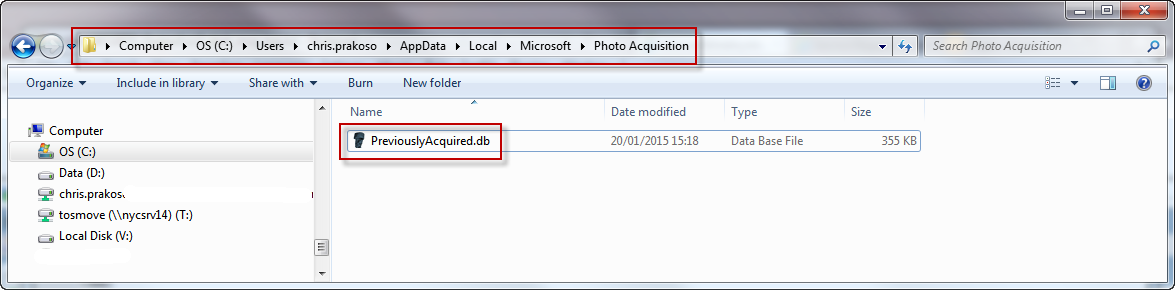
Then when you plug your iDevice, it will download all photos and videos as if it never download them before.
Done!
What if you can’t see AppData folder? Since AppData is considered a ‘system’ folder, Microsoft hides it by default. You need to ‘unhide‘ it. Here is how:
1. Open Windows Explorer.
2. Select the Organize on the menu bar to open the menu selection.
3. Choose the Folder and search options menu item.
4. In the Folder Options screen select the View tab and then select ‘Show hidden filed, folderd and drives‘ item under ‘Hidden files and folder‘ branch.
5. Click OK.
6. You should be able to see the AppData now.
-

- Open Organize Menu – Select Folder Options

-
- Turn On – Show hidden files, folder

Bonus: Third-Party Apps
If you, like so many others, never use or hate using the notorious Apple iTunes, there is another way and that is to use third-party apps.
Many software makers had recognised that iTunes was just too hard to use and rose to the challenge to develop an alternative app to iTunes and create a better experience to the uses.
Here are some third-party apps that you might want to have a look and try:
Wondershare TunesGo Retro
Wondershare is a Chinese software company that has about 50 odds apps actively developed and sold. One of these software is called TunesGo Retro.
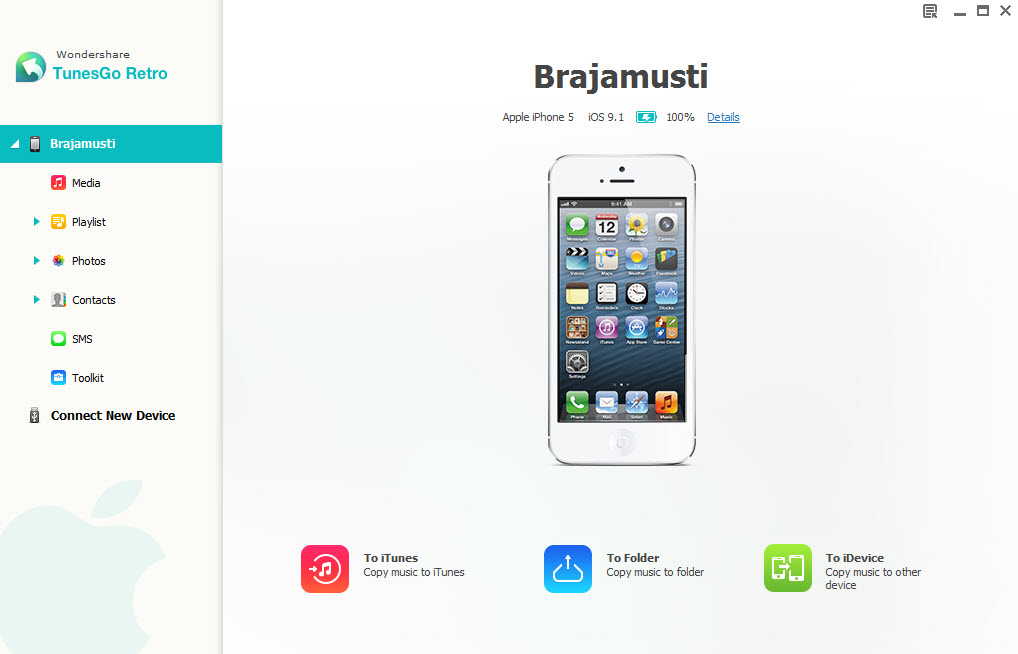
TunesGo allows you to access your iPhone data without using the notoriously bloated iTunes. These include your Songs, Photos and Videos, Contacts and SMS.
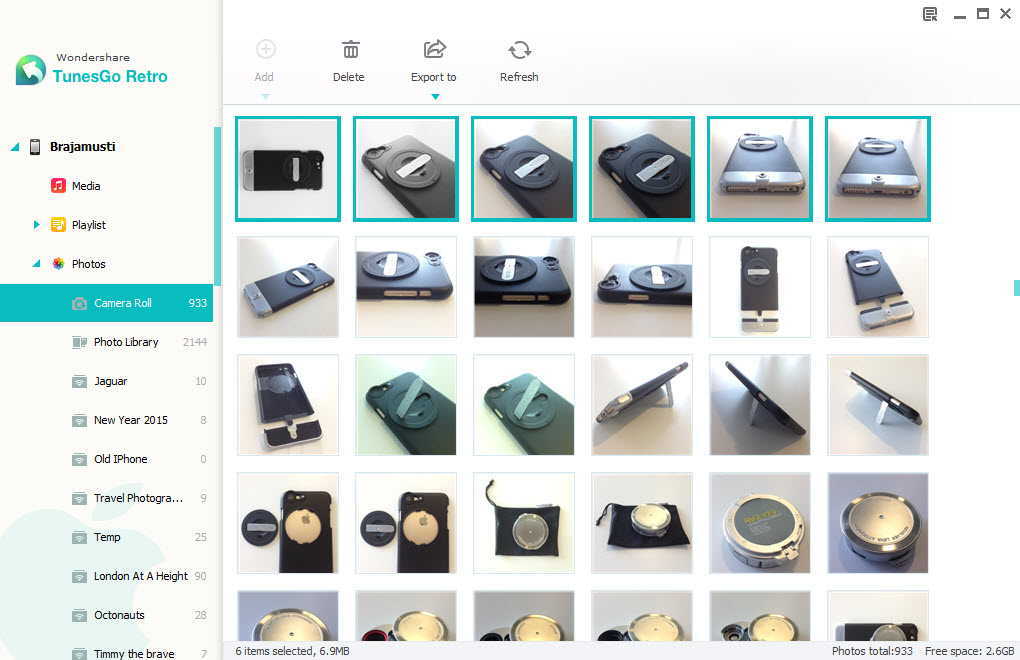
For Photos, you can get access to all photos in the all the folders you have in your iPhone. You can select any of these folders and download (export) the photos in it to your PC (or Mac) in a batch or individually.
By the way, as you can see in the following screenshot, downloading photos is not the only thing that TunesGo is good at.

TunesGo Retro is Free to try. There is a version for PC and for Mac. If you decided to keep it, the license costs $19.95 per year, or $39.95 for a lifetime (for 1 user).
Final Thought
For day to day backup, I prefer the second technique because once I set it up I don’t need to touch it again. As soon as I run the Import Photos/Videos it will transfer all my new photos and videos to my PC without my intervention. Hence I dubbed it the Quickest method.
As for the first method, I use it from time to time to transfer individual photo/video, especially one that has already been transferred previously. I also use this method to easily see all photos/videos I have on my iPhone and subsequently pick and choose which ones I could delete. I find the deleting photos/videos, especially lots of them are easily done using the Windows Explorer, as opposed to in the iPhone’s Camera Roll.
If you have any other method you usually do to transfer your photos to your PC please don’t hesitate to share it here. I’ll be happy to add it to the post![/fusion_builder_column][/fusion_builder_row][/fusion_builder_container]


very well done tutorial. however, the “import pics and videos” has apparently been removed from windows 8.1. to get it back this is only solution i have found: how to get back the “import photos using windows”option in the windows 8.1 autorun dialog box:
type cmd in search box, should see a menu where cmd is top choice; right click on it and run as administrator. this opens cmd prompt.’
type cd C:\Program Files\Windows Photo Viewer press ;then
type regsvr32 PhotoAcq.dll press;then
type regsvr32 PhotoViewer.dll press
close cmd prompt window
open control panel>autoplay and set camera storage and photos to “ask me every time”
now you have the same option as windows 7, where you can choose “import photos using windows”, tag your photos, and move them to a folder of your choice. once moved it deletes the pics from camera SD card.just like win 7.
Hi there! Thanks for the info. I must say since I don’t have a Windows 8 PC it will be hard for me to test this. Do you still get the Right Click menu item to import manually?
Hi there
I tried this on Windows 10 and it doesnt work – gives an error when I type this cmd:
regsvr32 PhotoAcq.dll
Hi, Natalia. To save the trouble of Chris, I found you this article which can help you to transfer photos and videos from iPhone to Wndows 10 easily.
http://airmore.com/iphone-videos-to-windows-10.html
Thanks Chris, brilliant article saved me a lot of time! cheers.
Glad I could help!
Help. My pictures do not show up in the DCIM file, even though I can see them in the pictures folder. Also, the Autoplay popup does not work for this device. Any help downloading these pictures would be very much appreciated, they are special from a wedding
Did you try to look for the picture using the method I described in step 11 of the Simple method?
Did you try to do step 5 I described for the Quick method?
A wonderful article. Since OS8 I have been frustrated by this. Thank you very, very much.
Very glad I could help.
Hi Chris
Since using an iPhone 6 my photos are displayed in 00s of seemingly randomly named folders under DCIM on my PC. I can make no sense of these and it was clearewr on my previous iPhone. I can’t even pickl a ‘recent’ folder to view recent photos as there’s no way to know – so I need to open 00s of folders to find one – life’s too short!!
This is driving me crazy – hope you can advise?
Thanks
Rob
Did you read my tips about using the ‘*’?
Just wondering if there is a way of making window ‘forget’ the photos/video it has already transferred? I am trying to copy all my photos on my Iphone5s to my laptop to free up space as I am going on a holiday but since the process has been interrupted once, and I had to delete the folder and restart, the computer can no longer detect new photos/new videos
thanks so much, really helpful.
Glad I could help!
How can I copy photos with the same name in windows 8 without having to delete one of the photos? My iPhone has named several pictures with the same number and now I can only copy and replace or do nothing….
Have you tried to copy it into different folder?
When i checked out my photos it said that i have 5 photos (btw i deleted all of it in my camera roll) then i tried looking at the internal folder and i saw those 5 photos I tried deleting the photos but it won’t work it says that i needed permission how do i do this?
Do you see those 5 photos still in Camera Rolls?
what about for whatsapp?
how to transfer iphone to the PC and then into the Iphone?
Sorry, can you elaborate more on your question? Thanks.
Thank you!!!! Searching with the * really helped me for locating my individual pictures much faster.
Glad I could help
in my photo album(iphone 4) I have 5 folders how do I download the other 4? , I can only download the camera roll one…
Hi, thank you for your help on importing my iphone photos! I imported them then instead of just adding the newer ones it seemed to import a random selection of some old and some new… so I want to re-import them all – what I can’t find is the file to delete so I can re-download all my photos again – any advice?…
I dont get the AppData?….
Hi, how do i import photos from ICloud Sharing albums to my computer?
Have a look here: http://moblivious.com/tips-tricks/photostream-to-pc-or-mac/
I wish this showed how to upload the music 🙁
To upload music you need to use iTunes.
why if the autoplay box didn’t appear? and when i checked the autoplay on control panel, my iphone didnt showed off. What should i do?
If you read more on my post, I wrote the way to do it manually.
Using the * search shows me all the photos, however, you can not copy them to another folder in Windows 7. I can only select an individual photo, right click ‘copy’ then ‘paste’ it into another folder in Windows (selecting more than one photo gives me the same error statement as trying to drag and drop)
You are right! I didn’t actually tested it, I assumed that Windows will let me copy them as normal. Thanks for the tips, I will update my post with this info.
First, thanks for this great tutorial, I appreciate it! I did find that once I used the *, and got the list of photos, I could right-click on an individual photo, click on “open file location”, and it would take me to the subfolder with all the photos from that specific date, which were actually appropriately date-stamped. Once you’re in the subfolder via this method, you can highlight and batch drag-n-drop into a new folder.
That’s a great trick! Thanks a lot!
On my iPhone4 I had 122 photos (in Camera roll) + 1 video (in Videos). When I attached the phone to my computer it showed only one file at DCIM (as always in fact) in which there were all my photos but not the vid. So I transferred the 122 photos and then deleted them and whoops: my video had not been transferred (obviously) but it had disappeared from my phone too (far from being obvious to me)! Could you please explain and help me to avoid this next time. Many thanks!!
Thank you – this was VERY useful indeed!
Glad we could help!
PLEASE HELP!!! All of your information is the most well explained I have seen! However, I cannot find an answer to my problem/. Hoping you can help. I am trying to download pictures off of my iphone 5s to my computer. It looks like and says there are no pictures or videos. However there are almost 3200 pictures i need to get off of there because I have no memory left on my phone 🙁 I do not know how to get it to recognize the pictures are there on my camera roll. Thaks for any help u can give me.
Hi Sue,
Have you tried the instruction to make the photos and videos recognised again which I wrote underneath point number 10 on that article?
When I tried that, there was no “AppData”. so I am not sure what to do next. Thanks for any ideas!!
Sue, if you read just a bit more still on the same article, I explained how to ‘unhide’ the AppData.
You explained it very well and I turned on the app data and the import videos and pictures to windows, but it still does not transfer them, any other options?
When you say ‘it still doesn’t transfer them’, what do you mean by that? Does it say ‘nothing to import’?
THANK YOU ! You are a life saver. I was searching numerous sites for HOURS trying how to find out how to re-download previoulsy imported photos. Just find it out now. Thanks a lot !
Hi there! I’m glad I could help 🙂 Please feel free to share the article to your network, who knows somebody might be looking for the same thing like you. Thanks a lot!
Brilliant! Thank you for this well done tutorial! I have 32 folders within my DCIM and it is maddening to find the most recent. I find that the majority of the new files are in the same couple of folders but randomly a recent picture will get placed in a folder with pictures from years ago. I was about to pull my hair out and I’m so thankful I stumbled on this tutorial. I think I’ll just use the import option from now on and hopefully that will continue to recognize just the new pictures (it’s currently backing up all 3200, most of which are already on there but it should be easy enough to delete duplicates).
I am curious, as this was my next move before finding this tutorial, what do you think would happen if I moved all my photo/video files from those 32 folders into just one folder within DCIM? I’m assuming it would confuse the phone and pictures would be all over the place? I assume the useless (to me) files make some sort of sense to my iOS. I was so frustrated I was about to experiment and find out, but now I don’t have to. Thoughts though? Would it be catastrophic?
I’m glad I could help!
Unfortunately you can only ‘take out’ file from it, and not ‘put in’ to it. So as a result, you can’t really move the files around, we are completely at iOS’ mercy. This is why my prefer method is the auto-import.
Hello Chris,
Thanks for the article but almost but no cigar yet!
I have an ipad that is now on os8.02. Since the upgrade to os8.x the “camera roll” has gone. Also the pictures on the ipad do not appear anymore in the dcim folder. Only pictures taken after the upgrade do. I have about 1000 pictures on the ipad but your methods have only allowed me to download about 80 (those taken since the upgrade to os8.x).
Any ideas how i can get the old pictures off?.
If i try itunesto sync , it appeared to sync with a empty folder ( or just the 80 pictures) and wanted to delete the others on the ipad. Inpresume this as the usage bar on the bottom changed from about 3gb to about 300mb. I cancelled out of that one.
So how can i do it.
I think others have had similar situation but have not explained it in the same way.
Thanks
Hi there,
Have you read my other article in regards to the missing camera roll? http://moblivious.com/tips-tricks/ios8-camera-roll-workaround/
Let me know if this doesn’t help.
Thanks , but no it does not.
I found all the “missing” pictures about three minutes after the upgrade. Did not take a genius to work it out.
The problem is that even though I can see all the photos in the moments, years, collections whatever lists, I cannot copy them off to a PC. THEY DO NOT APPEAR IN THE DCIM FOLDER. They do all appear on the ipad photo app.
Also I cannot delete them using “‘photo’ , it says I must copy it first.
At the top of your article on camera roll you say it is restored in version os8.1. I just checked I am at 8.1.2
If those photos are in the Moments but not in the Camera Roll, the only place the could exist that I can think of is in the iCloud (My Photo Stream).
Try another article of mine: http://moblivious.com/tips-tricks/photostream-to-pc-or-mac/
This happened to me as well by the way, I lost most of my Camera Roll photos when I upgraded to iOS 8. Fortunately I always backed up my photos to my PC/Mac regularly so I didn’t really care ‘much’ about losing them, although it really pissed me off as it means I had to start to build up my library from scratch (there was a reason why I wanted to keep those 3000+ photos handy on my Camera Roll).
But I had My Photo Stream turned on so if I had to get them back I could have done it via iCloud.
Try this and let me know how it goes. I know it’s pretty frustrating.
Bytheway, the latest iOS 8 version should have the Camera Roll back. Do you think you can attach your Album page screenshot? It should have the Camera Roll folder, and if you take picture now, it should go there.
Sorry Chris , not in the Photo Stream either.
Anyway now it has gotten worse.!!!!
I loaded a program called Phototrans from iMedia.
I started it up and it told me I had
93 photos in Camera Roll
1150 photos in Photo Library
110 photos in Photo Stream
2 photos in My Album
this was looking good……..
Then I clicked on the photo library icon and it started “reading” the photos and displaying them. It was taking a while. Then it stopped and I had control again. I clicked on a duplicate, right clicked and selected delete. It went away again and thought about it. When it came back I had NOTHING in the photo library anymore.
I exited the programme , came back, nothing.
Checked on the actual Ipad,, also gone….
So now I have tried looking at the backup which I though I was doing.
I tried restoring from Itunes, It gave me back my position from three days ago but no pictures.
Have tried using “Wondershare” to find the deleted photos, no photos but I can get back 1170 safari bookmarks if I pay for it,,, woopie.
Now I tries “phonerescue” to look at the actual backups in itunes on my PC and the iCloud.
Again only the photos in camera roll foolder and photo stream folder appear as options now.
Now using that programme to look at Icloud backups and it does not see any photo backups at all. The Camera Roll and Photo stream folders are there but have zero contents. There is no Photo Library folder.
There are also only THREE backups in Icloud ALL dated within 5 days of each other last december. When I know we have reset the Ipad many times in the last year and it reloaded EVERYTHING including the photos. So they were in the ApplE cloud somewhere before.
So now it looks like its right royally messed up.
Where are all these wonderful backups it keeps doing , all useless now I need it. Just goes to prove why I like DOS!!,,, find files , copy them , put copy in safe place, easy. Apple …. complicated unless yoiu do it there way. And thats great until it screws up.
Yes I see a Camera roll Folder, and Photo Stream Folder and Recently Deleted folder. I cannot remember if there was a Photo Library folder in the same place but I saw all the old pictures in the timeline view.
And yes , new pictures goto the Camera Roll folder now, All pictures have since about October last year when we up graded to OS8.
Great tutorial, easy to read and well structured. I was only searching for a way to reset Windows memory in order to re-run a 2nd full back-up, this answers it perfectly, you made my day, thanks !
You’ve made my day with your comment! Glad I could help 🙂
That simple “*” search is the tip I’ve been looking for!!!! So many damn DCIM folders these days I couldn’t find anything. Thank you for the help!!!
Glad I could help.
I used to be able to delete photos using Windows Explorer (Win7), but now that stopped working. I get “could not be deleted. You do not have permission to delete this item.” I recently upgraded my iPhone 4S from iOS7 to iOS8.
Interesting, I don’t know how you were able to delete photos directly from the iPhone, but as far as I can remember I’ve never been able to do that.
I’ve been doing it that way for years…not sure why I no longer can’t.
Hi, I am too having the same problem of not being able to delete , use my phone for work to take pictures of jobs then come back to office use the same way as you put I used to “cut” the selected photos and paste them in appropriate folders as there is no use for them on my personal phone. Any one got any ideas???? things used to be so simple lol
thanks
You see, in my personal experience, I haven’t been able to do what you did … ever. I’ve never been able to copy or cut and paste directly from my iPhone DCIM folder to my PC folder, at least not in a batch. This was why I wrote this guide, because the only way I could copy a whole bunch of the photos are via the Windows camera download function.
If you use this method, you have an option to automatically delete the photos from your device after they’ve finished downloaded.
With the import wizard, it appears I can only import all pictures and then delete all pictures. But I only want to import and delete some…is this possible?
No you can’t pick and choose using the wizard. Use the other method I described to do this.
That’s how I used to do it. I can still copy what I want, but I can no longer delete from my PC. You also state this ability in your instructions. How?
Just a note for windows 8.1. I am using 8.1 Pro and I still have the “Import Pictures and Videos” setting. Thus, I go to the Desktop, press “windows and e” keys (on the keyboard) to open Explorer. Right click on the iPhone’s icon and click on “Import Pictures and Video”.
Thanks for the info!
Very clear tutorial. I’ve encounter issue while uploading photos and videos from ipad/ipod to my PC. When I double click on the device, a window pop-up and says Window explorer has stop working and it is looking for solution, thus I cant even see the picture folder. Can you help me with that?
Thanks a lot.
Unfortunately that might mean that your Windows is broken. Can you try to right-click on the device and choose Import Photos (i.e. use the second method I explained in the article)? See what you get from that.
That’s quite a nasty error you have. It looks like you need to re-install your Windows. In the meantime, if you want to backup your photos, you can use the other method that I described in the article.
There is a way around it to copy and paste more than one file, follow the steps in the original post, then once you know the name of one of the files you were looking for, then you search for it in the search window, when it opens right click, and the “properties” and you will now know the name of the DCIM folder where it was saved. When you click on that DCIM file you can copy and paste all the files at once…Regards!
Thanks for the tips, I will put this in the article.
help , when I press import picture and video in my device it says no pictures or videos found how come?
That means either you really don’t have any photos or videos on your Camera Roll, or that all your photos and videos had been downloaded already. Have you tried to reset it? The instructions to do taht is also on this article.
Hello, also sometimes when your ipohone is locked, and you try to open your photos in Windows, the DCIM folders will appear empty. You would have to unlock your ipohone (for some reason I also have to open any chat in Whatsapp) and the re-insert iphone cable in PCs USB port, and then all photos appera inside their respective DCIM folders. Hope this helps…best regards!
Thanks for the tips!
Thanks A lot chris
So I’m using the 2nd option since you said that’s how I will be able to delete photos from my iphone using Windows…however do you know why it would say importing 182 pics when I have over 2,000 in my library?
Just realized actually it’s only showing me the pics I’ve taken since I got this new iPhone…so how do you suggest I transfer pics from my entire iCloud library using Windows AND be able to delete them?
To download all your photos on iCloud follow the steps in this post: http://moblivious.com/tips-tricks/photostream-to-pc-or-mac/
AMAZING and so helpful! Thank you so much for all the time it took to put this together!!
Glad we could help! Please feel free to re-share the article so other people can benefit from it as well. Thanks in advance.
When I try to open the device on windows the internal storage shows no files or folderws at all, nor does the import photos and videos. Any idea why this might be? I have a windows 7 pro SP1
First you need to have the iPhone unlock, then sometimes it will ask whether you would ‘trust’ the PC. Did you get this message on your iPhone when you plug your iPhone in?
Also sometimes Windows just don’t recognise the iPhone, especially when the PC is setup to open iTunes automatically. I normally just wait until the iTunes is fully loaded, and then re-attache the USB cable.
Hi Chris, & thanks for such a visual n easy to understand tutorial. My prob was WAY too many pix still on iphone that had been imported but not deleted. I followed your tip about deleting the file and windows is now re-importing all my pix and deleting so I can free up space on iphone (next will be how to free up space on computer – always on “e” in the red)
Anyway, is there a way to restore/add that appdata file back?
thanks again 🙂
Glad I could help!
Do you mean to put back your photos to your iPhone? You can follow the tips I wrote here: http://moblivious.com/tips-tricks/how-to-transfer-photos-to-iphone-from-pc-mac/
Hi Chris, & no – my problem now is that with the appdata file gone, each time I plug in iphone to computer it synchs with itunes and recopies stuff like voice memos etc. that I haven’t deleted, taking up more space on computer – AND, mostly, I no longer get the autoplay coming up to import the pix from iphone to computer. I thought if I restored that file all would be ok and I could just be better about catching the “delete after import” tick box in the future…
thoughts?
Thanks,
jo
🙂
Windows should create a new AppData file after your re-import. If you go to that folder now you ‘should’ see a new one created. This way Windows will remember what it had been downloaded, and the next time it imports the photos it will only do the new one. This nothing to do with iTunes. iTunes has its own setting. The AppData is only used for that standard import functionality. So I don’t know why your iTunes is reimporting stuff.
To tell you the truth I never get autoplay anymore in my PC either, so I just do it manually (as I described in my article). You can try to turn on Autoplay, also described in the article.
Thank You! Your tricks help a big time! Appreciate this.
Glad I could help
Fantastic. I was tearing my hair out trying to find some photos and your tip was an absolute a God send.
Glad I could help!
I wondered if you know how to get photos saved on a memory stick onto your ipad. I have downloaded them from the peg to the PC and then attached the ipad to the computer, but they wont copy onto the ipad. I think the photos need to be in DCIM format, but I am not sure how to get the photos back to this format? Can you help please?
The reason that they won’t copy is because you can’t do that seemingly simple operation with iOS Device, and it’s not about the file type either. You should read my other article here: http://moblivious.com/tips-tricks/how-to-transfer-photos-to-iphone-from-pc-mac/
wonderful tutorial..better than the best…My problem is sumthing else…different from the regular issue…
when i connect my iphone-4s..to my windows-8 laptop..i get this “Apple Iphone” icon..double click on it..i get “Internal Storage” and it shows some space occupied..when i double click on this internal storage…it shows “this folder is empty” when it already shows “8.58GB free of 29.5GB”..please help..how to transfer all the data to my laptop…i cant access my phone…as the screen is all broken…thanks in advance
Have you tried the second method I described in the article, i.e. using auto-import? Do you know if you have iCloud turn on?
Make sure that you can view Hidden Folders, here is the link for instruction to change the setting: http://www.experts-exchange.com/Hardware/Apple_Hardware/iPhone/Q_28644517.html
Also I’m hoping that you don’t have a lock screen, because Windows 8 doesn’t seem to like it if you connect an iPhone with a locked screen. If you do, you might want to try to find a Windows 7 machine.
Great tutorial Chris. My problem is my iphone 5s says I have 486 photos in my camera roll, however when I plug it in, unlocked, windows only recognises 27 photos. I’ve deleted the appdata and tried having different apps open (whatsapp, viber, etc). Any ideas?
Do you have the iCloud Photo turned on? If Yes, try to turn it off temporarily.
How do I import iPhone 6 photos on to windows PC along with the location tags the iPhone displays when I browse the photos on phone?
Just like what I had described in this post. The location tag (also called Geotag) is embedded ‘inside’ each image, so when the image is downloaded the Geotag information is also downloaded along with it is in.
Thanks, your tips are very helpful and more specifically for someone who has switched from andriod to ios.
Glad I could help. Please feel free to share it to anybody you like.
Cheers Chris, very useful information provided. Bookmarked this website and will return again, for sure.
Glad I could help.
Thanks so much. The Quickest solution works great in Windows 7. Neither Apple or Microsoft support could give me a quick solution like this. Now I have everything backed up for when iCloud erases 1167 photos when I up load. Thanks again.
Glad I could help.
My iPhone doesn’t even show up in “My Computer”?
Unlock the phone before you plug it in. If you’ve never connected it before it will take a while to load, and sometimes it will ask if you ‘trust’ the device (it will pop up on your phone).
Trying to transfer photos from my iPhone 6 to a dell laptop. I keep getting a message “nothing new to import”. Can anyone help me with this?
Hi Heather,
Please read again my article, and you will find in there the way to ‘reset’ the download. Let me know if I can be more help.
thank you sooooo much!!!!! Alot of other web sites no where near as helpful or easy to follow. thank you again!!!!
Glad I could help!
Hi Chris, wondering if I may have a bit of help please? 🙂
I plugged in my iPhone 5s and downloaded new photos when it asked if I wanted to import new photos and videos… when I did something happened and some photos didn’t load. So I deleted the whole file on my computer which had the downloaded photos because I couldn’t be bothered searching the random photos which failed to download..I only knew I had less than there should be.
Anyway, when I tried to re download it said ‘no new photos or videos found’ …so I have been searching for solution and found out about having to find to find …. C:\Users\[username]\AppData\Local\Microsoft\Photo Acquisition\PreviouslyAcquired.db …and to change the end to ‘.old’….
I have been able to find app data and microsoft…But I cannot find photo acquisition.
Please are there any suggestions? If the file may be named something else?? or if there are other ways to import pictures and videos the same way; in order of date taken and all in one file.
(as you can probably tell by now, I’m not a tech kinda person and would appreciate any advice :”D)
Thank you :))
Hi Amira,
Have you changed the settings to Show Hidden Files (that I described in the article)?
I have an iPhone6. In Photos- Albums it only says “All Photos” not Camera Roll. Shen I try to pull it up on my desk top and open the DCIM and subfolder, it only shows 5 out of 485 photos.
Help!
How many folders under DCIM folder do you have?
Two folders
And between these two folders you see only 5 photos in total? Are you using iCloud Drive?
For the first method, what happens if you copy the files in batch?
It would be fine. It would be just like normal copying from a USB drive.
When I plugged the USB cable from the iDevice to the PC, I did not see the iphone device icon in My Computer.
i have a Iphone 4s and my computer is window 7
I did unlock my phone before I plugged it in and my iphone device is not on My computer.
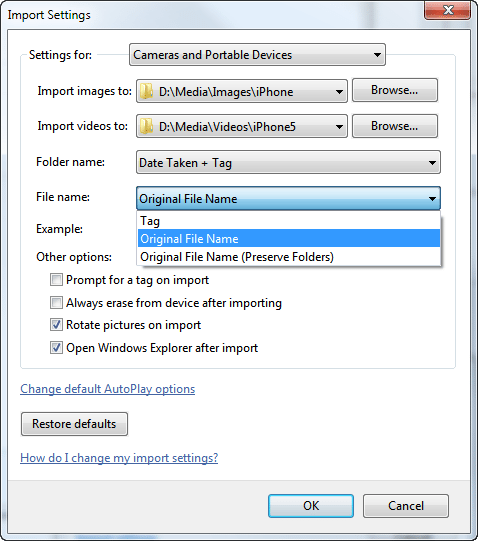
Can you elaborate on the options in Import Settings under Folder Name and File Name? I know you said it was intuitive but unfortunately not for me. Mostly confused about the folder name options …Date imported + Tag, Date Taken+Tag, Date Taken Range+Tag, Tag+***, and Tag. Under file name there are three options…Tag, Original File Name, and Original File Name (Preserve Folders). I know from experience that Tag means it renames the original photo name ***001, ***002, etc or something like that which is a problem if you do multiple imports and have the same file name multiple times.
Ultimately I would like to import all photos into a pre-named folder and then I can move them where I want.
Thanks
You are right about the tag option. When you choose the option with tag on it, you will get asked to provide the tag before it starts the import process. For Folder, for example if you choose the Date Taken + Tag option, it will import the photos into folders named according to the photo’s date and it will append the tag of your choice as a suffix.
I normally just import mine to the Date Taken + Tag folder and preserve the original file name. This is going to be my raw repository, and then I am free to copy or move these photos to where ever I want to put them.
You’re awesome!! Thank you for all the easy to read and useful information. It completely helped me.
Glad I could help
Tried everything to re-import my videos from my iphone6 and your simple tip about deleting the previously acquired file was a life saver. Thanks so much.
Glad I could help!
It says my phone is up to date, but when i go back on the devices thing, its still under “Unspecified”
I’m not sure what you mean, where exactly you see this ‘Unspecified’?
why in my iphone 5 have 4 folders: all photos1199, favorites35, selfies6, videos23. When look into dcim folderi i see just a fraction of the pictures. thanks for these tips are great
Are you using iCloud Photo Library?
thanks mate….saved me a lot of hassle…thumbs up!!
Under Simplest, step 3, Portable devices. None show up. Any idea why?
You need to unlock the phone and plug it in. Sometimes it asks you if you want to trust the device of which you need to answer yes.
Phone is unlocked and plugged in
I don’t think there is a driver installed for the phone
Unlock phone? why do I need to unlock the phone?
Device driver software not successfully installed. MTP USB device Failed.
Not all my photo folders on the ipad are showing up in my DCIM folder on my PC.
I have the ipad plugged into the usb and most of the folders are available to copy apart from the main one with over 4000 photos in it.
Are you using iCLoud Photo Library?
No I’m not using iCloud photo library. But I do have an ICloud account. I wanted to copy the photos straight onto my PC, like I have done with the photos that have shown up under DCIM.
I also tried selecting and adding the photo’s in the “Pictures” folder to the “Camera roll” folder but the “Camera roll” folder was shaded so unavailable to select. Thanks
I would like to use the Windows “import pictures” function, but I cannot figure out how to avoid having it import EVERY darn picture on the iPhone each time. I would like to set a date taken range, or even the IMG number since I know the last one I have imported. Is there a way to use this function to import only SOME of the photos on the iPhone?
Windows should remember which photos it imported the last time, so the next time you do the import again it will import only the new one. If you want to import selectively you have to resort to manual copy via the explorer.
Hi there. Thank you for the helpful article. I was able to successfully transfer from my iphone to my PC laptop. Unfortunately, it only recognized 64 of the 3,000 photos that were in my camera roll. Any suggestions/help would be greatly appreciated!
Have you ever done a transfer before?
Yes I have, but from my iPhone to my desktop. I used to have success with that, but now it’s doing the same thing as with the laptop.
I have successfully done a transfer from the same iPhone to my desktop in the past, but had the same issue recently with that.
Windows remembers the photos that had been imported previously, if you want to re-import them have a read at the section in the article where I described how to reset your download.
Thanks for your continued help. The problem is that most of those photos never actually downloaded. Should I attempt to reset my download in this case?
Nice sharing! And I want to recommend you another software called FonePaw iOS Transer which is professional transfer tool. You can transfer files between iOS devices and computer. It’s useful and convenient.
Hi,
I want to copy file from my pc to iphone internal storage, is it possible ?
No it’s not possible. iPhone internal storage is locked, no other app can have access to it.
Okay,
then how would be transfer my whatsup db to IOS ?
Is this a new phone number? Can you explain what you did and what do you want to do?
When I plug my phone into my computer and click on the phone and internal storage, there is nothing that appears, all blank and so i cannot get through to any of my photos etc..
I always use second option- BUT It did not import the videos! Only photos, that’s a big disappointment because I deleted the videos already hoping that it was already imported alongside with photos. please help! Can’t find my imported videos, or it skipped all the videos, maybe a bug???
Did you check the setting? Have a look ‘where’ it’s supposed to import the video.
I have an Iphone 6S+ and when connected it did not bring up autoplay, so I followed your instructions for changing within the control panel Autoplay to “Import pictures and videos using Windows” BUT when I went back to computer, it still did not show up, nor was there a title “Portable Devices” There must be something else that must be changed ?
Did it not pop up a confirmation message asking if it should trust the machine?
Try also to reboot your iPhone and your PC. And try again.
No message but I followed your advice and re-booted my Iphone 6S+. When I connected it again to the PC, it automatically downloaded every photo in the phone. (snicker). Well, that worked sort of, but I can select any photo I want. Thanks Chris.
The problem I’m having is that I have 1382 photos on my iPhone that I want to upload to my Surface Book, but only 42 photos appear in File Explorer.
Where in the hell are the other 1340 photos? A month ago I had no problem plugging in my iPhone to the Surface and ALL the photos showed up in File Explorer. Today only 42 appeared. I have tried a few other “fixes” today (using iTunes, using AnyTrans, etc…) and none of them work. I still only see 42 photos.
How can I find the rest of the photos and upload them to my PC?!?
Thanks!
Are you using iCloud Photo Library?
New computer with Win 7, trying to make room on iphone 6 by downloading pics. Initial message said “no new videos or photos”; I tried taking a new photo. It will download the new photo but not the other 350+ on phone. I erase .dp file, password protection is off. I don’t know what else to do?
Are you using iCloud Photo Library?
how can i sync videos to my iphone from windows?
You need to use iTUnes, or send it via email, or upload it to Dropbox (or similar cloud storage) and download it back on your phone.
Thank you so much! This was so helpful! I am totally grateful to be able to import my pictures easily!!!
Great article. Regarding the import photos and videos wizard in Windows, is it limited to certain amount of data? because i have more than 40k photos in my iPhone 6s but this feature doesn’t work well for me, any solutions please?
Thanks for your help, this issue was driving me crazy. I was hoping there was a better way..
Chris, this was an incredible easy to follow, who the heck knew it could be so easy to follow & do format! OK i didn’t set up my Folder for Pictures when I should have but I can take care of that easily.
Thank you for the great job. I’m not a techie but i can follow directions especially when there are pictures to help out!
I’m using Windows 10, which i don’t like but I’m happy today. Thank you. Is there any easy way to print this out for future use, I’m old & forgetful!!
Hi! When I am connecting my Iphone to my computer everything is fine, but when Im going in to the DCIM folder I can not see all of the photos in the different folders. Maybe I can see 20 photos but in my phone I have about 1000. What do you think is wrong? I hate Itunes and I really wish this problem could go away..